Thursday 29 October 2015

French Nails but better

French Nails but better


The french nail is one of the most iconic nail art forms. With classically white tips with natural colored base it looks prim and proper. But I thought it was long overdue a make over, as with every iconic look it's hard to beat but you can always try. 


Here is my own version of a french nail with new detailing. It has a peacock feather at the side of the white tip. This is not very clear as the camera I have is not very good and has no zoom. 


I used normal nail varnish and a striping tool, it also has silver dots which I used a dotting tool and glittery varnish and a tear drop blue gem stone. 


This look didn't take too long and wasn't too difficult. It has a really unique effect and looks really pretty and good for formal occasions or work. 


I love french nails as it makes your nails look really fresh and clean. 


The design lasted around 7 days, the gem stone was the first area of damage and it pulled paint off with it. 


I think some improvements for next time would be to shorten all my nails to the same length, my ring and little finger always grow longer far faster than the middle or index. This can leave my index finger looking rather short. But besides this I was pleased with the overall impact. 

TOP TIP: If you are NO good at painting on a french tip you can buy stencils which are inexpensive as a guide. 


I hope you enjoyed reading this, if you have done a french manicure please post me a picture or comment. I would love to hear from you. 

Laura x


Pink flower nails

Pink flower nails

Lovely bright pink nails! With grey and white flower design and silver glitter polka-dots.  This design was done with a mixture of nail varnish and a new tool to my arsenal called acrylic paint. 


Nail varnish is difficult to work with as it drys very quickly when it comes to nail art, so this was much easier with acrylic paint. They were not fancy paints they were basic paints brought from any craft shop. Water color and oil are either too thick or too thin to use. One of the major benefits to using acrylic is if you make a mistake you just get a wet ear bud and wash it off. Cool right? 


This is one of my all time faviourate pink nail varnish and was one of my first Models Own nail polish. Because they are a bit pricey I buy them on the 2 for 3 offer when they happen in Superdrug. It is so bright and summery. This polish comes from the product line Polish for Tans in Sun Hat.


In terms of tools I used a small paint brush and flat edge nail brush. I also used a dotting tool for the dots down the side. 


They really did shine with the top coat from collection 2000 gel, it was really beautiful. They stayed on the nails for 10 days +. 


I hope you enjoyed reading this and perhaps got some cool ideas. Please feel free to comment. 


Laura 

Nautical nails


Nautical nails 


I love things which have a theme, are colorful and just pretty. These are two designs I am going to show which were nautical inspired nail art I made. Nautical tends to be white, blue and red and some kind of stripe.


This nautical design also included a anchor made of navy blue nail gems. I used a striping tool with the white and blue. It is a blue base with white lines, although you could always do this the other way. The top coat which was very shiny was a collection 2000 gel top coat. 


Here is another design with plain and simple nail designs. Both are very fun to have a go at. I hope these have given you some inspiration . If this has given you some cool ideas please leave me a comment.


Laura


Bright yellow Nails- Great night out nails

Bright yellow Nails


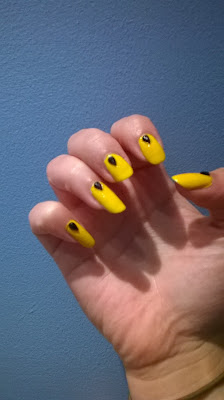
Yellow nails were pretty fun and bright, great to start a conversation with anyone. But actually achieving this yellow was much harder than I imagined. I hunted for a true bright banana yellow and I could only find pastel yellows. Finally I found a real bright yellow. 


The large gems are from a gem pallet from a large fashion retailer but you can buy these all the time online. 
I had to layer the yellow to get this level of brightness. It was also placed on a Models own white base coat and Essies first base. 


They took a long time to dry as there was 4 layers of nail varnish on the nail. But it lasted and looked good for a whole 10 days. 


Products:

 Maybelline: Electric yellow 
Models Own: White 
Top: Models Own Hyper gel
Base: Essie first base 


TOP TIP: Let each layer dry individually, a whole manicure can take upto 24 hours in total to fully dry. 


If you know of any yellow which was stronger pigmentation please let me know. I hope you enjoyed reading. 

Laura 


Animal nails tutorial

Animal print how to 
Animal print is one of my all time fave nail art ideas. People often asked where i brought the fake nails from to only find out they were my own nails and hand drawn designs. 

This design is by far one of the hardest I have done because trying to make the animal print look like animal print is one high mountain I had to climb. I used a dotting tool for the central color and striping tool for the area around. 

I have very strong natural nails which have taken years of growing then cutting off. I wear house gloves while handling chemicals, but when I garden I just go bare handed. 

On the left is one of my first attempts of animal print. It was pretty time consuming so only did the design on two fingers on each hand. This is hard using the hand you don't write with to do the other hand, but it's easier getting someone else to do it for you. 


I have never actually paid to have my nails done by anyone, I have always done my own as I think £25 for your nails is a lot of money, and I don't have money to throw away. I also like doing other peoples nails for them, but I don't charge as they are my family. My Nan loves having her nails done in a orchid color from rimmel, I brought her one for Christmas last year. 


These were pretty fun to do, I used a pink from a brand called Jessica and Models own Hypergel white and turquoise gloss.  It looks more green on the background of pink. I also used a Rimmel glitter for the index finger. I didn't think the glitter added much. 


Here is another animal print design this time on a white background, and whole hand print. The gold was a sally hansen nail polish, the black was from Rio nail art and came with striping brush. 


TOP TIP: This is actually pretty hard so don't beat yourself up if you find it hard! Just do one nail and do the rest when you have practiced. 


I hope you enjoyed reading this and picked up some ideas, I have had no training or have any professional tools or such, I just learned by having a go. 


Laura 

Dotty flowers- Negative nail art

Dotty flowers- Negative nail art


Hello and here are one of my negative space nail designs. It is actually pretty easy once you have the base skills of using a dotting tool or equivalent. 


First of all you need some base cote and my go to is the Essie first base, there there is no color at all between your nails and the base coat. 
1) Place your first dot and make dots going round it in the same color, they should all join the central dot.
2) When that has dried go over the central dot in white or a color of your choosing. 
3) Go ahead and do your other flowers, try to make each hand unique to give interest. 
4) top coat can be shiny or matte, I used a matte topper for a different texture using Barry M matte top coat. 


TOP TIP: Although this is not a tough design you do have to be steady with a dotting tool. If you find this difficult have a go at some basic dotting techniques which can be found Here.

TOP TIP 2: You can use glitter paints but you do have to build them for they to become opaque.


I hope you enjoyed this, please take a look at all the other blog posts :D 

Laura  x

Wednesday 28 October 2015

Polka dot nail art inspiration

Polka dot nail art 


Want to know how to make dots? Here is some ideas of what you can use: 
1) A dotting tool- you can buy these anywhere these days 
2) hair pins- use the ball point as the perfect dot 
3) cocktail stick 
4) Ball point pen
5) using the brush- yes this is an option and one I used for many years 
6) The other end of a paint brush- just dip in and go 
7) Dotting tool bottle from Argos normally comes with a long striping brush in the bottle too. 


How to get it even looking? 
Don't line them up, look at the picture on the left and see how the dots don't meet in straight lines. That makes it look nice and not too  messy. It does take a bit of practice but you'll get there. 


bellow are some other dotting nail art pictures. 


This nail art has used dotting to look like flowers which is a fun way to use dots. There are lots of ways to use dots. I hope you can come up with your own and share them with me. 


Laura 

Sunday 4 October 2015

Galaxy nail art

Galaxy nail art design 


Take a trip into the unknown with this very effective nail design. Easy to do, with a little patience you can recreate this nail design for your own nails. Once you have mastered this nail design there are loads of designs you will be able to do with the same set of skills. 

This uses a few different tricks to get the effect right for a deep galaxy. First you need a base color, mine here is black. I chose 3 galaxy colors of blue, purple and white and the star colors of white. 

Tools you will need include: 
Dotting tool 
Thin long brush 
sponge chopped into the size of a peanut 
basic nail polish brushes to apply 
top and base coat 
base color and varnishes


Although the effect is quite striking it is pretty easy to do and 
was not overly time consuming. The pains dry fast and when sponging they always dry very quickly. The other thing which I liked about this is that there is no set formula to getting it right. Because it does not have a basic pattern, have a play and find your own unique design. 

Products used- Rimmel french nail for the white 
Black- Gift from a friend but close to the Rimmel one 
Pink- Rimmel bight pink, although it does look like purple there is purple on top from collection 2000. 
Blue- Rimmel cornflower 
Topcoat- Models own 
Base coat- Essie first base 


TOP TIP: Try and make each nail look unique, trying to make them all look the same makes them look like stickers and not hand done. Remember this is quite tricky and did take me a few try's to get right. 


I hope you enjoyed this nail design, please feel free to comment and follow. 

thank you 

Laura 

Oriental Inspired Nails

Oriental Inspired nail design 


Here I am going to show you my own oriental inspired nail design, I am unsure if the letters actually mean anything as I only googled Chinese words and painted them on, so apologies if it doesn't make sense or is in any way wrong or rude. I hope you like my design and get your own inspiration from it. 


I couldn't find any oriental inspired nail designs so came up with my own. This design used red as the base color, black and gold as the design colors and golden glitter to add a bit of fun and sparkle. The black and white lines are suppose to be cherry blossoms. 

Product information: 
Gold glitter: Sally Hansen wedding glitter 
Gold paint: Rio nail art pens 
Black: Rio nail art pens 
Red: Rimmel Kate
Base coat: Essie first base 
Top coat: Models own 

TOP TIP: I took my inspiration from my pajamas and some DVD's I have  which are anime. People really seemed to like these, they were quite fiddly but were well worth the effort. They lasted around 7 days before chipping.  


I hope you enjoyed this. Feel free to comment and follow me. 


Laura x 


Nail Gem Ideas

Nail Gem Ideas 


Here are so basic ideas for nail gems. They are mostly pictures but they will give you some good ideas and easy to do nail designs. I am not a professional and do this for fun from home. I have no formal training, but just enjoy having a go. It is not my job or anywhere close to my actual job, but I enjoy doing friends and family's nails. 


Nail gems need something to stick to, you can but professional level gem glue, but personally I already own clear nail varnish and it sticks well enough to that. Make sure the gem is well encased in sticky top coat and cover again twice to ensure security. If your nail gem tugs or gets stuck on things you haven't used enough glue or have placed it wrong. If you're worried it won't set in time, or have a job/lifestyle where you need it to stay on tight, I would suggest getting the gem glue. 

You can use gems under standard nail varnish or acrylic nails. Remember you can also use other things such as stickers, glitter or materials under the nail too.  

Above in the picture we have several types of gems from studs to circle gems and tear drop shapes. 


TOP TIP: Never use nail gems which are way too big for your nails, this can make them look odd, if you have small nails which are short, get some nail gems in proportion to your nails. 


Where to buy? 
You can buy nail gems from lots of places, you can buy them from fashion stores and even the supermarket. I get mine online from Amazon where you can find a huge variety of sizes and shapes. I brought around 1000 for about £6, I got many shapes and i'm still enjoying them everyday. 

Below are some more recent nail gem designs. 


As you can see there are a lot of things you can do with nail gems. They really are fun to use. As long as you stick them down well they will last as long as your nail varnish does. 

I hope you enjoyed, please feel free to comment. 

Laura